반응형
Recycler View 란?
`ListView`
RecyclerView 이전에는 스크롤되는 리스트를 만들기 위해 ListView를 이용했다.
간단하게 리스트를 만들 수 있지만 몇가지 단점이 있다.
- 세로 리스트만 가능
- 데이터가 많아 질 수록 스크롤 시 끊김 발생 : 데이터의 아이템만큼 뷰 생성하기 때문
- 커스터마이징이 제한적이고 복잡함
이러한 단점들이 보완된 RecyclerView가 나온 후로는 거의 사용을 안한다.
`RecyclerView`
많은 데이터 집합을 효율적으로 화면에 표시할 수 있도록 하는 뷰
채팅 목록, 게시글과 같이 항목들을 스크롤 가능한 목록으로 구현할 때 사용함.

ListView의 경우 스크롤 할때마다 화면에 표시될 아이템을 새롭게 생성한다.
RecyclerView는 화면에 표시될 아이템을 먼저 만들고 스크롤되면 안보이는 뷰를 재활용하여 데이터만 수정하여 화면에 표시한다.
Recycler View의 구성요소
1. Adapter
: 데이터를 ViewHolder에 바인딩해줌
주요 함수
- `getItemCount(): Int` : 전체 아이템 개수 판단
- 반환한 만큼 `onBindViewHolder()` 호출
- `onCreateViewHolder()`: 아이템을 구성할 때 이용할 ViewHolder 객체 반환
- 이때 반환한 객체는 `onBindViewHolder()` 의 매개변수로 전달 됨
- `onBindViewHolder()`: 뷰에 데이터를 바인딩
2. ViewHolder
: 하나의 아이템 View를 저장하고 재활용되는 객체
3. LayoutManager
: 아이템들을 RecyclerView에 배치
RecyclerView 적용
1. 아이템 레이아웃 작성하기 ( item_layout.xml)
<?xml version="1.0" encoding="utf-8"?>
<androidx.constraintlayout.widget.ConstraintLayout xmlns:android="http://schemas.android.com/apk/res/android"
    xmlns:app="http://schemas.android.com/apk/res-auto"
    xmlns:tools="http://schemas.android.com/tools"
    android:layout_width="match_parent"
    android:layout_height="80dp"
    android:padding="12dp"
    android:clickable="true"
    android:focusable="true"
    android:foreground="?attr/selectableItemBackground"
    >
    <ImageView
        android:id="@+id/profileImg"
        android:layout_width="50dp"
        android:layout_height="50dp"
        android:background="@drawable/circle_background"
        android:scaleType="centerCrop"
        android:layout_marginEnd="10dp"
        app:layout_constraintStart_toStartOf="parent"
        app:layout_constraintEnd_toStartOf="@id/name"
        app:layout_constraintTop_toTopOf="parent"
        app:layout_constraintBottom_toBottomOf="parent"
        android:src="@drawable/default_img" />

    <TextView
        android:id="@+id/name"
        android:layout_width="0dp"
        android:layout_height="wrap_content"
        android:textSize = "16sp"
        android:textStyle="bold"
        android:layout_marginEnd="10dp"
        app:layout_constraintStart_toEndOf="@id/profileImg"
        app:layout_constraintEnd_toStartOf="@id/time"
        app:layout_constraintTop_toTopOf="parent"
        app:layout_constraintBottom_toTopOf="@id/lastMsg"/>

    <TextView
        android:id="@+id/lastMsg"
        android:layout_width="0dp"
        android:layout_height="wrap_content"
        android:textSize="12sp"
        android:textColor="#4D4D4D"
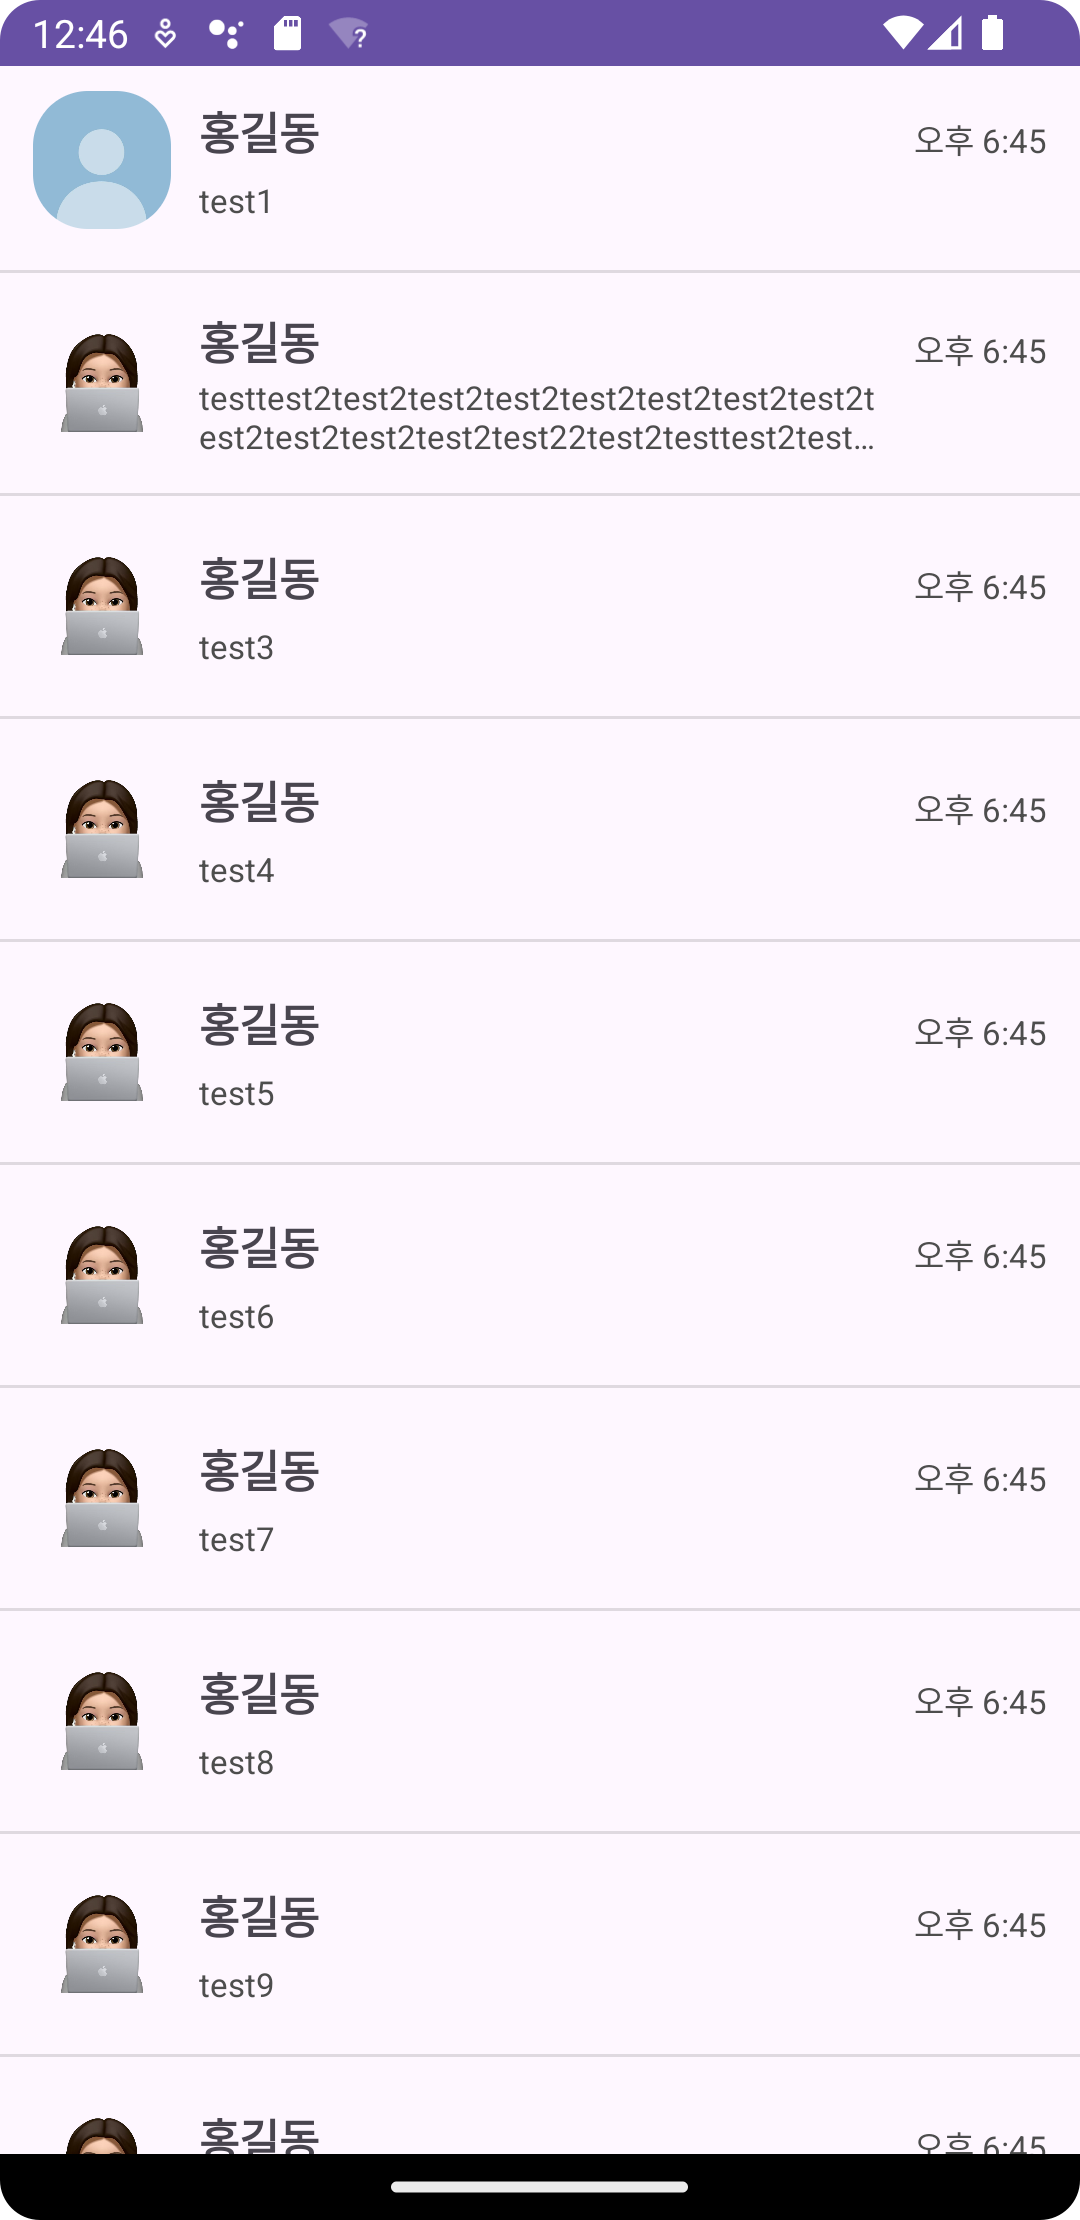
        android:maxLines="2" //2줄까지만 표시
        android:ellipsize="end" // 나머지는 .. 처리
        app:layout_constraintStart_toStartOf="@id/name"
        app:layout_constraintEnd_toEndOf="@id/name"
        app:layout_constraintTop_toBottomOf="@id/name"
        app:layout_constraintBottom_toBottomOf="parent"/>
    <TextView
        android:id="@+id/time"
        android:layout_width="wrap_content"
        android:layout_height="wrap_content"
        android:textSize="12sp"
        android:textColor="#4D4D4D"
        app:layout_constraintEnd_toEndOf="parent"
        app:layout_constraintBottom_toBottomOf="@id/name"
        />
</androidx.constraintlayout.widget.ConstraintLayout>
* 프로필 이미지를 둥글게 자를 circle_background.xml
<shape xmlns:android="http://schemas.android.com/apk/res/android"
    android:shape="rectangle">
    <corners android:radius="20dp" />
</shape>
2. 데이터 준비하기
- 데이터를 담을 Data Class 정의
data class ChatItem(
    val profileImgId: Int?,
    val name: String,
    val lastMsg: String,
    val time : String
)- 예시 데이터 작성
object ChatSampleData {
    val chatList = listOf(
        ChatItem(null, "홍길동", "test1", "오후 6:45"),
        ChatItem(R.drawable.profile, "홍길동", "testtest2test2test2test2test2test2test2test2test2test2test2test2test22test2testtest2test2test2test2test2test2test2test2test2test2test2test2test22test2", "오후 6:45"),
        ChatItem(R.drawable.profile, "홍길동", "test3", "오후 6:45"),
        ChatItem(R.drawable.profile, "홍길동", "test4", "오후 6:45"),
        ChatItem(R.drawable.profile, "홍길동", "test5", "오후 6:45"),
        ChatItem(R.drawable.profile, "홍길동", "test6", "오후 6:45"),
        ChatItem(R.drawable.profile, "홍길동", "test7", "오후 6:45"),
        ChatItem(R.drawable.profile, "홍길동", "test8", "오후 6:45"),
        ChatItem(R.drawable.profile, "홍길동", "test9", "오후 6:45"),
        ChatItem(R.drawable.profile, "홍길동", "test10", "오후 6:45"),
    )
}
3. ViewHolder 클래스 정의 (ChatViewHolder.kt)
//RecyclerView.ViewHolder를 상속받음
class ChatViewHolder(val binding: ItemLayoutBinding): RecyclerView.ViewHolder(binding.root) {

    fun bind(item: ChatItem){
        binding.name.text = item.name
        binding.lastMsg.text = item.lastMsg
        binding.time.text = item.time
        binding.profileImg.setImageResource(
            item.profileImgId ?: R.drawable.default_img
        )
        binding.profileImg.clipToOutline = true
        binding.profileImg.outlineProvider = ViewOutlineProvider.BACKGROUND
    }
}
4. adapter 정의 (ChatAdapder.kt)
//RecyclerView.Adapter를 상속받음
class ChatAdapter(val items: List<ChatItem>):RecyclerView.Adapter<ChatViewHolder>(){

	//아이템 개수 반환
    override fun getItemCount(): Int = items.size

	//뷰 홀더 객체 준비
    override fun onCreateViewHolder(parent: ViewGroup, viewType: Int): ChatViewHolder =
        ChatViewHolder(ItemLayoutBinding.inflate(LayoutInflater.from(parent.context),parent,false))

	//뷰 바인딩 기법으로 뷰홀더 객체를 생성해 반환
    override fun onBindViewHolder(holder: ChatViewHolder, position: Int) {
        holder.bind(items[position])

		//클릭시 log 띄움
        holder.itemView.setOnClickListener{
            Log.d("ChatAdapter", "${items[position].name} 클릭")
        }
    }
}
5. RecyclerView 출력 (MainActivity.kt)
class MainActivity : AppCompatActivity() {
    override fun onCreate(savedInstanceState: Bundle?) {
        super.onCreate(savedInstanceState)

        val binding = ActivityMainBinding.inflate(layoutInflater)
        setContentView(binding.root)

        binding.recyclerView.layoutManager = LinearLayoutManager(this)
        binding.recyclerView.adapter = ChatAdapter(ChatSampleData.chatList)
        binding.recyclerView.addItemDecoration(
            DividerItemDecoration(
                this,
                LinearLayoutManager.VERTICAL
            )
        )
    }
}
6. 실행
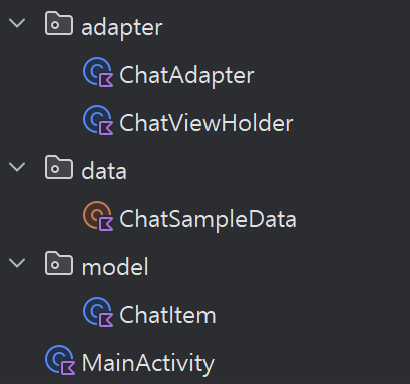
7. 패키지 구조
반응형
'학습 기록 > 안드로이드' 카테고리의 다른 글
| Intent (0) | 2025.03.30 |
|---|---|
| Fragment (0) | 2025.03.24 |
| ViewBinding (0) | 2025.03.23 |