반응형
Fragment 란?
- Activity의 UI를 분할해서 재사용 가능한 컴포넌트로 만든 것
- 하나의 Activity안에 여러 Fragment 추가 가능
- 각 Fragment는 자신만의 생명주기, 레이아웃, 로직을 가질 수 있음
왜 Fragment를 쓸까?
초기 안드로이드
- 모든 UI가 Activity 중심
- 하나의 화면 = 하나의 Activity
- UI를 전환하려면
Intent로 Activity를 새로 띄워야함
문제점
- Android 기기 다양해지며 태블릿과 같이 화면이 넓은 기기에서 액티비티 클래스에 너무 많은 코드를 작성해야함.
- Activity 코드의 길이가 길어지며 유지보수가 어려워짐.
Fragment 특징
Fragment의 장점
- 재사용성: 여러 Activity에서 같은 Fragment 사용 가능
- 유연한 UI 구성: 화면 크기나 방향에 따라 동적으로 Fragment 조합 가능
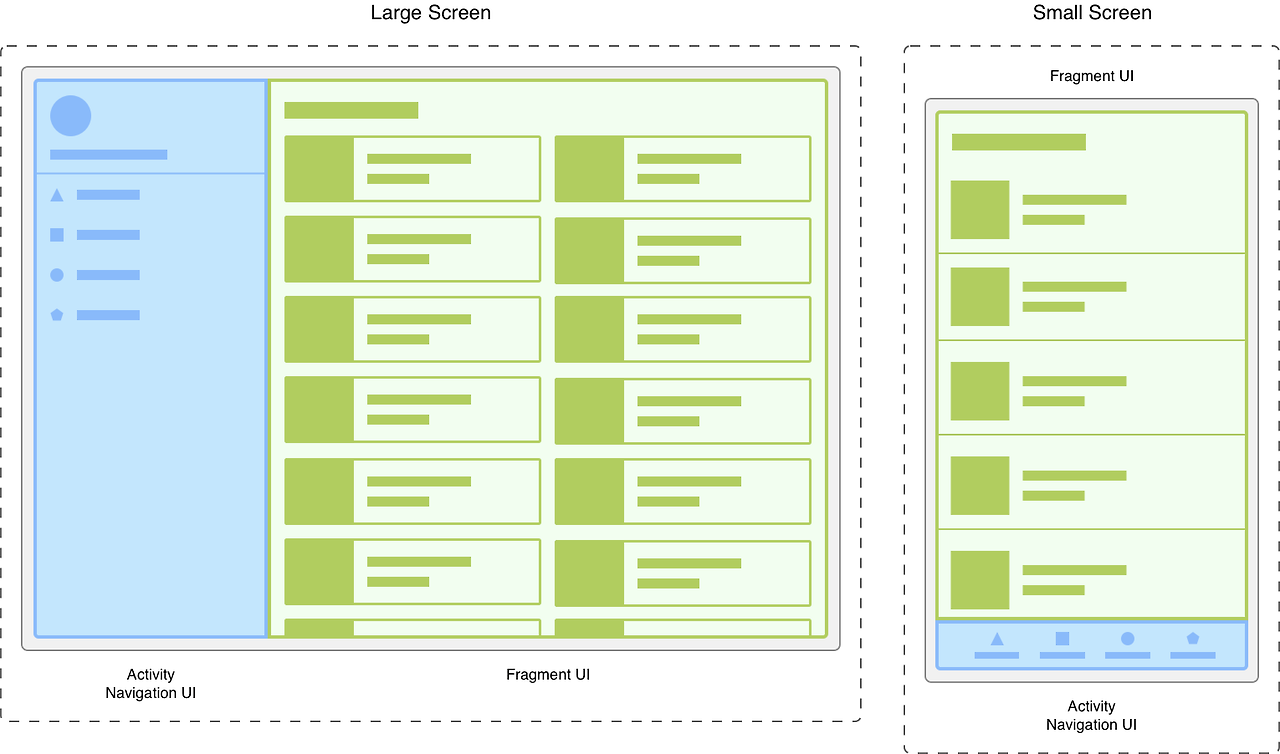
- 가벼운 전환: Activity 전환보다 메모리 부담이 적고 부드럽게 전환 가능
- 모듈화: 각 UI 컴포넌트를 독립적으로 관리할 수 있음 ⇒ 유지보수
- FragmentManager를 통해 Fragment의 변경사항 발생 시 Fragment Back Stack 에 변경 사항을 기록할 수 있음.
생명 주기
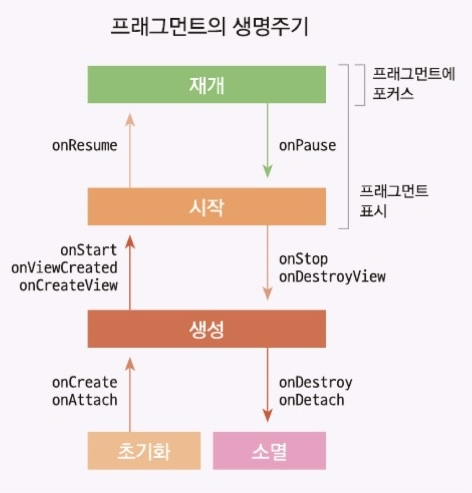
- 초기화(initialized), 생성(created), 시작(started), 재개(resumed), 소멸(destroyed) 단계로 구분됨
- 전체적인 흐름
- 생성:
onAttach(context) -> onCreate() -> onCreateView() -> onViewCreated() -> onStart() -> onResume() - 종료:
onPause() -> onStop() -> onDestroyView() -> onDestroy() -> onDetach()
- 생성:
- 백 스택(Back Stack): 화면에 보이지 않는 순간 제거하지 않고 저장하여 다시 이용할 수 있는 기능
- 백스택을 사용하지 않은 Fragment 교체⇒
onDestroy까지 호출되어 기존 Fragment제거 - 백스택을 사용한 Fragment 교체 ⇒
onDestroyView까지만 호출. 해당 Fragment가 다시 출력된다면onCreateView()부터 호출됨 - FragmentTransaction의
addToBackStack()함수 이용
- 백스택을 사용하지 않은 Fragment 교체⇒
transaction.addToBackStack(null)
주요 생명주기 메서드
onAttach(context): Fragment와 Activity를 연결onCreate(): Fragment 생성될 때 호출. UI를 제외한 초기화onCreateView(inflater, container, savedInstanceState): XML을 inflate함. 즉 뷰 객체를 준비onViewCreated(view, savedInstanceState): UI 초기화, 이벤트 연결 등onResume(): Fragmemt가 화면에 보여지는 단계. 인터랙션이 가능한 상태 ex) 버튼 클릭onPause(): 다른 Activity나 Fragment가 추가되면 일시정지 됨. 이때 중요한 데이터들을 저장onStop: 완전히 화면에서 사라지기 직전 상태. 이때 onStateInstance()를 호출하여 UI상태가 저장되기 때문에 Avtivity를 다시 띄우면 이전 상태가 보임onDestroyView(): UI가 완전히 사라짐. 이때 UI 관련 리소스 해제.onDestroy(): Fragment 자체가 파괴. 남은 리소스 정리onDetach(): Fragment와 Activity가 완전히 분리될 때 호출. context 참조도 해제해야 함.
Fragment 적용하기
1. build.gradle(:app) 에 의존성 추가
implementation("androidx.fragment:fragment-ktx:$version")
2. Fragment 클래스 생성(Fragment1.kt, Fragment2.kt)
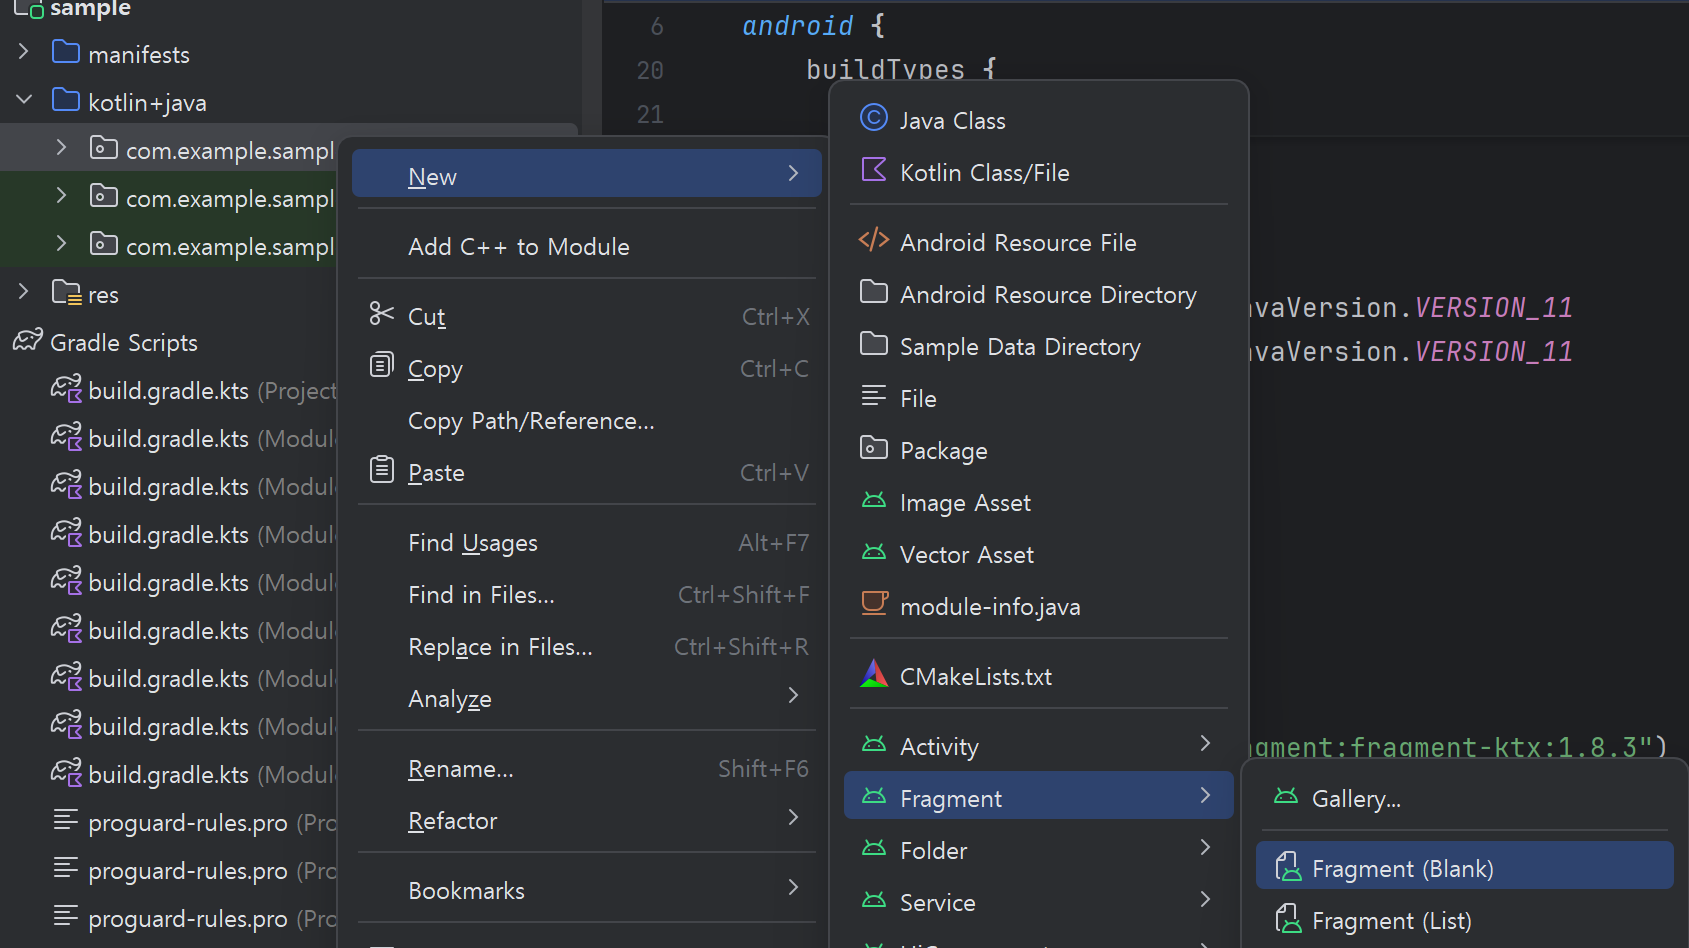
Activity 클래스를 생성할 때 처럼 Activity 말고 Fragment를 선택해 생성하믄 된당.
3. Fragment 레이아웃 만들기(fragment_1.xml, fragment_2.xml)
<?xml version="1.0" encoding="utf-8"?>
<LinearLayout xmlns:android="http://schemas.android.com/apk/res/android"
    android:layout_width="match_parent"
    android:layout_height="match_parent"
    android:orientation="vertical"
    >
    <TextView
        android:id="@+id/fragment_textView"
        android:layout_width="match_parent"
        android:layout_height="match_parent"
        android:textSize="20dp"
        android:textStyle="bold"
        android:gravity="center"
        android:text="Fragment1" // Fragment2
        android:background="@color/white" //@color/black
        android:textColor="@color/black"/> //@color/white
</LinearLayout>
위와 같이 간단한 fragment_1.xml 과 fragment_2.xml을 작성한다.
두 파일은 주석이 써있는 부분만 다르고 나머지는 동일하다.
4. activity_main.xml 구성

<?xml version="1.0" encoding="utf-8"?>
<androidx.constraintlayout.widget.ConstraintLayout xmlns:android="http://schemas.android.com/apk/res/android"
    xmlns:app="http://schemas.android.com/apk/res-auto"
    xmlns:tools="http://schemas.android.com/tools"
    android:id="@+id/main"
    android:layout_width="match_parent"
    android:layout_height="match_parent"
    tools:context=".MainActivity">

	//Fragment를 담을 레이아웃
    <FrameLayout
        android:id="@+id/fragment_container"
        android:layout_width="match_parent"
        android:layout_height="0dp"
        app:layout_constraintBottom_toTopOf="@id/frag1_btn"
        app:layout_constraintEnd_toEndOf="parent"
        app:layout_constraintStart_toStartOf="parent"
        app:layout_constraintTop_toTopOf="parent"/>
    <Button
        android:id="@+id/frag1_btn"
        android:layout_width="wrap_content"
        android:layout_height="wrap_content"
        android:text="fragment1"
        app:layout_constraintBottom_toBottomOf="parent"
        app:layout_constraintEnd_toStartOf="@id/frag2_btn"
        app:layout_constraintStart_toStartOf="parent"
        app:layout_constraintTop_toBottomOf="@id/fragment_container"
        android:layout_marginBottom="20dp"/>
    <Button
        android:id="@+id/frag2_btn"
        android:layout_width="wrap_content"
        android:layout_height="wrap_content"
        android:text="fragment2"
        app:layout_constraintBottom_toBottomOf="@id/frag1_btn"
        app:layout_constraintEnd_toEndOf="parent"
        app:layout_constraintStart_toEndOf="@id/frag1_btn"
        app:layout_constraintTop_toBottomOf="@id/fragment_container" />
</androidx.constraintlayout.widget.ConstraintLayout>
Fragment를 담을 FrameLayout과 화면 이동을 위한 버튼 2개를 추가했다.
5. MainActivity.kt
class MainActivity : AppCompatActivity() {

    private lateinit var binding: ActivityMainBinding

    override fun onCreate(savedInstanceState: Bundle?) {
        super.onCreate(savedInstanceState)
        binding = ActivityMainBinding.inflate(layoutInflater)
        setContentView(binding.root)

	//첫 실행 시 Fragment1을 띄움
        if(savedInstanceState == null){
            setFragment(Fragment1())
        }
        //버튼 클릭시 프래그먼트 전환
        binding.frag1Btn.setOnClickListener {
            setFragment(Fragment1())
        }
        binding.frag2Btn.setOnClickListener {
            setFragment(Fragment2())
        }
    }

    //프래그먼트를 교체하는 함수
    private fun setFragment(fragment: Fragment){
        supportFragmentManager.commit {

        	//fragment_container에 fragment를 띄움
            replace(binding.fragmentContainer.id, fragment)
            setReorderingAllowed(true) //프래그먼트 간 생명주기 최적화
            addToBackStack(null) //뒤로가기 시 이전 Fragment로 돌아감
        }
    }
}- `setReorderAllowed(true)` : 프래그먼트 전환 시 내부 순서를 최적화하도록 허용
- 프래그먼트 전환 시 생명주기에 맞춰 순서대로 진행되는데 안정적이지만 성능면에서 비효율 적일 수 있음
- true로 설정 시 FragmentManager가 내부 순서를 최적화하여 성능을 높여줌
- 일반적으로 true 설정을 권장
- 만약 생명주기 순서를 정확히 지켜야 할때에는 false로 해야할 수있음
- `addToBackStack(null)` : 현재 Fragment 상태를 백스택에 저장해서 나중에 뒤로가기 시 돌아갈 수 있도록 함
- Fragment1 -> Fragment2 생명주기 흐름
- Fragment1 : onPause -> onStop -> onDestroyView (onDestroy와 onDetach는 호출 X)
- Fragment2 : onAttach -> .. onResume
- Fragment2 -> Fragment1 (뒤로가기) 생명주기 흐름
- Fragment1: onCreateView -> .. onResume (기존 인스턴스를 재사용하기 때문에 onCreateView 부터 호출)
- Fragment2 : onPause -> onDetach ( onDetach까지 모두 호출)
- Fragment1 -> Fragment2 생명주기 흐름
* 뷰바인딩이 이해가 안된다면 -> 참고
6. 실행
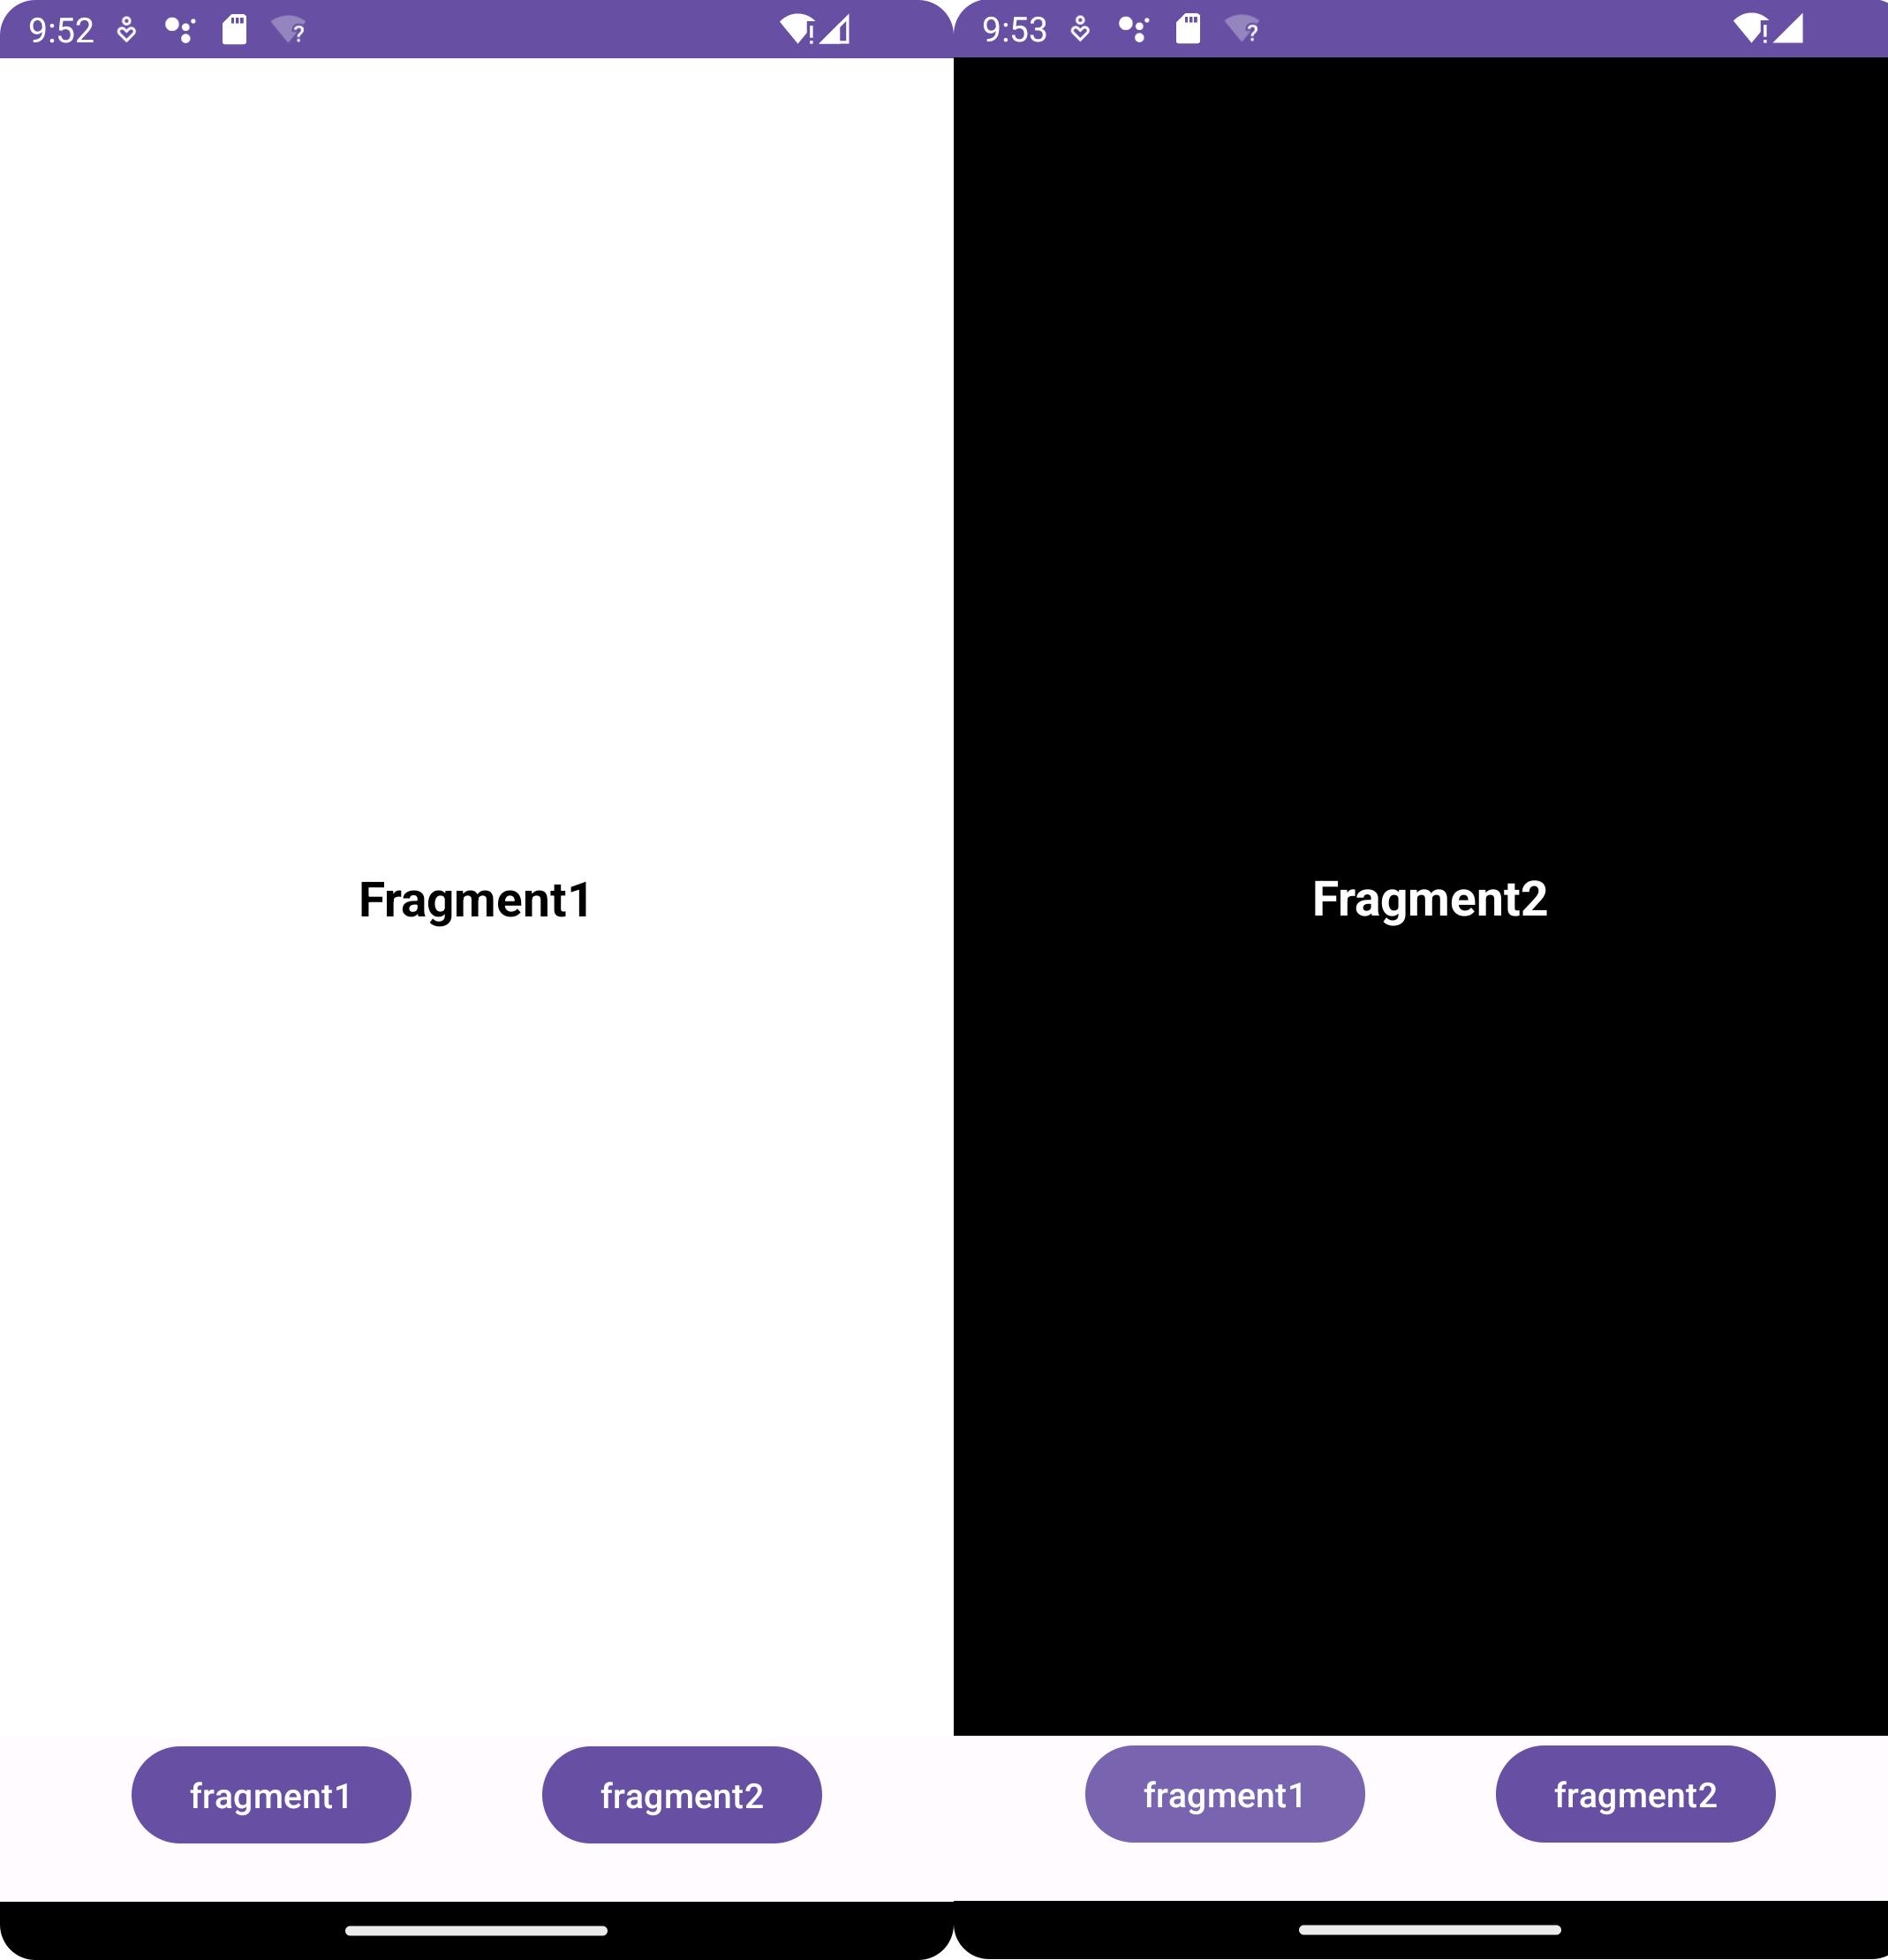
버튼을 클릭하여 화면을 전환해보고 뒤로가기도 한번씩 해봅니다.
마무리
막 공부하다가 하나도 머리에 안들어와서 정리해봅니다..
공식문서는 너무 어렵다.. 공식 문서에 익숙해지고 싶다...
반응형
'학습 기록 > 안드로이드' 카테고리의 다른 글
| Intent (0) | 2025.03.30 |
|---|---|
| Recycler View (0) | 2025.03.29 |
| ViewBinding (0) | 2025.03.23 |